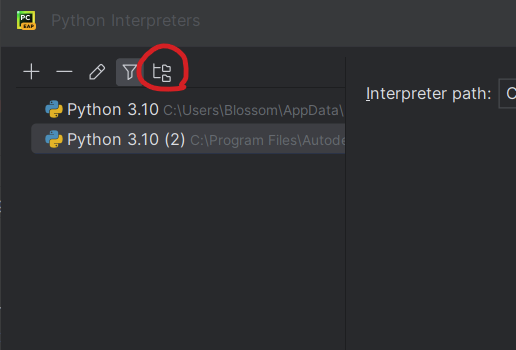
Hope you all are doing fine. I was searching and reading something about environment variables of maya and then i spotted using maya through external interpreter, I was like wait, forget about external interpreter, how to use maya cmds outside of maya script editor, this was an old bucket list task. So i decided to do this and realized, SHIT! this is a tedious task only because of maya docs – has no information at all.
But the maya community is just amazing, alot of people have uploaded amazing blog posts. You can read it in the helpful links section.
To my pyside series I dont know why i did not add this earlier, this wont look important but……….for a newbie or a beginner, persorn who is starting out with pyside2 in maya 2018 without any coding skills and just diving for the sake of fascination, kindly check the below code,
import sys, pprint
from pyside2uic import compileUi
pyfile = open("[path to output python file]\output.py", 'w')
compileUi("[path to input ui file]\input.ui", pyfile, False, 4,
False)
pyfile.close()
the above code will help you convert the qtDesigner .ui file to .py file, try it out.
Below is an old tutorial for ik-fk stretchy. This setup was made for gaming purpose, as every joint counts in the engine so me and my sir(Santosh) worked out and came out with simple solution. Its a long ass tutorial. Have a look and let me know.
I’ll be using class for PySide2 scripts, classes are best suited for UI creation. But for the first i’ll even use a function and a non-function script for the first timers to understand, as it is really confusing to begin with when you are starting out(honestly i have been through that road).
We’ll create basic scripts, just to get warmed up with PySide2 and Maya
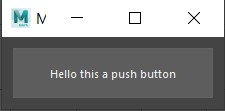
Create a disabled button
Create a Toggle Button
Toggle Signal and Slot
Image based button with stylesheet(windows)
Lets Get started guys, lets make, break and evolve.
The below code is written with PyCharm — download link and i have used PyLint for inspection you can download via PyCharm
before you start with the code if you want to go by the rules
With the help of below code you can create a disabled pushbutton
"""
Class
This module is to create a disabled push_button with pyside2 for maya2018
"""

from PySide2 import QtWidgets


class PushButton(QtWidgets.QWidget):
	"""
	This class is to create a disabled push button
	"""

	def __init__(self):
		super(PushButton, self).__init__()

		self.button = QtWidgets.QPushButton("Hello this a push button")
		self.button.setEnabled(False)
		self.layout = QtWidgets.QVBoxLayout()
		self.layout.addWidget(self.button)
		self.setLayout(self.layout)
		self.resize(200, 50)


if __name__ == "__main__":
	PUSH = PushButton()
	PUSH.show()


from PySide2 import QtWidgets
win_wid = QtWidgets.QWidget()
button = QtWidgets.QPushButton("Hello this a pushbutton")
button.setEnabled(False)
layout = QtWidgets.QVBoxLayout()
layout.addWidget(button)
win_wid.setLayout(layout)
win_wid.resize(200, 50)
win_wid.show()


from PySide2 import QtWidgets

def push_button():
    win_wid = QtWidgets.QWidget()
    button = QtWidgets.QPushButton("Hello this a push button")
    button.setEnabled(False)
    layout = QtWidgets.QVBoxLayout()
    layout.addWidget(button)
    win_wid.setLayout(layout)
    win_wid.resize(200, 50)

    return win_wid

test = push_button()
test.show()
With the below code you can create a pushbutton
"""
Class
This module is to create a toggle push_button with pyside2 for maya2018
"""

from PySide2 import QtWidgets


class PushButtonToggle(QtWidgets.QWidget):
    """	This class is to create a toggle push button	"""

    def __init__(self):
        super(PushButtonToggle, self).__init__()

        self.qpushbutton = QtWidgets.QPushButton("Hello this a push button")
        self.qpushbutton.setCheckable(True)
        self.qpushbutton.setFixedSize(200, 50)
        self.layout = QtWidgets.QVBoxLayout()
        self.layout.addWidget(self.qpushbutton)
        self.setLayout(self.layout)


if __name__ == "__main__":
    PUSH = PushButtonToggle()
    PUSH.show()


win_wid = QtWidgets.QWidget()
qpushbutton = QtWidgets.QPushButton("Hello this a push button")
qpushbutton.setCheckable(True)
qpushbutton.setFixedSize(200, 50)
layout = QtWidgets.QVBoxLayout()
layout.addWidget(qpushbutton)
win_wid.setLayout(layout)
win_wid.show()


from PySide2 import QtWidgets

def push_button():
    win_wid = QtWidgets.QWidget()
    qpushbutton = QtWidgets.QPushButton("Hello this a push button")
    qpushbutton.setCheckable(True)
    qpushbutton.setFixedSize(200, 50)
    layout = QtWidgets.QVBoxLayout()
    layout.addWidget(qpushbutton)
    win_wid.setLayout(layout)
    win_wid.show()


    return win_wid

test = push_button()
test.show()
With the help of below code you can create a toggle pushbutton
"""
Class
This module is to create a toggle push_button with pyside2 for maya2018
"""

from PySide2 import QtWidgets


class PushButtonToggle(QtWidgets.QWidget):
    """	This class is to create a toggle push button	"""

    def __init__(self):
        super(PushButtonToggle, self).__init__()

        self.qpushbutton = QtWidgets.QPushButton("Hello this a push button")
        self.qpushbutton.setCheckable(True)
        self.qpushbutton.setFixedSize(200, 50)
        self.layout = QtWidgets.QVBoxLayout()
        self.layout.addWidget(self.qpushbutton)
        self.setLayout(self.layout)


if __name__ == "__main__":
    PUSH = PushButtonToggle()
    PUSH.show()


win_wid = QtWidgets.QWidget()
qpushbutton = QtWidgets.QPushButton("Hello this a push button")
qpushbutton.setCheckable(True)
qpushbutton.setFixedSize(200, 50)
layout = QtWidgets.QVBoxLayout()
layout.addWidget(qpushbutton)
win_wid.setLayout(layout)
win_wid.show()


from PySide2 import QtWidgets

def push_button():
    win_wid = QtWidgets.QWidget()
    qpushbutton = QtWidgets.QPushButton("Hello this a push button")
    qpushbutton.setCheckable(True)
    qpushbutton.setFixedSize(200, 50)
    layout = QtWidgets.QVBoxLayout()
    layout.addWidget(qpushbutton)
    win_wid.setLayout(layout)
    win_wid.show()


    return win_wid

test = push_button()
test.show()
With the help of below code you can add func to toggle pushbutton(inheritance) courtesy Sultan
"""
Class
This module is to create a toggle push_button with pyside2 for maya2018
"""

from PySide2 import QtWidgets


class PushButtonToggle(QtWidgets.QWidget):
    """	This class is to create a toggle push button	"""

    def __init__(self):
        super(PushButtonToggle, self).__init__()

        self.qpushbutton = QtWidgets.QPushButton("ambocclusion_toggle")
        self.qpushbutton.setCheckable(True)
        self.qpushbutton.setFixedSize(200, 50)
        self.layout = QtWidgets.QVBoxLayout()
        self.layout.addWidget(self.qpushbutton)
        self.setLayout(self.layout)


import maya.cmds as cmds
import maya.mel as mel


class Toggle(PushButtonToggle):
    def __init__(self):
        super(Toggle, self).__init__()

        self.qpushbutton.clicked.connect(self.ambocclusion_toggle_button_func)

    def ambocclusion_toggle_button_func(self):
        if self.qpushbutton.isChecked():
            cmds.setAttr("hardwareRenderingGlobals.ssaoEnable", 1)
        else:
            cmds.setAttr("hardwareRenderingGlobals.ssaoEnable", 0)


if __name__ == "__main__":
    PUSH = Toggle()
    PUSH.show()
Below code is an image based button with toggle func
"""
Class
This module is to create a toggle push_button with an image with pyside2 for maya2018
"""

from PySide2 import QtWidgets
from PySide2 import QtGui

class PushButtonToggle(QtWidgets.QWidget):
    """	This class is to create a toggle push button	"""

    def __init__(self):
        super(PushButtonToggle, self).__init__()

        self.qpushbutton = QtWidgets.QPushButton()
        self.qpushbutton.setIcon(QtGui.QIcon("D:\\All_Projs\\Python_Proj\\icons\\animal-paw-print.png"))
        self.qpushbutton.setFlat(True)
        self.qpushbutton.setCheckable(True)
        self.qpushbutton.setFixedSize(200, 50)
        self.layout = QtWidgets.QVBoxLayout()
        self.layout.addWidget(self.qpushbutton)
        self.setLayout(self.layout)


import maya.cmds as cmds
import maya.mel as mel


class Toggle(PushButtonToggle):
    def __init__(self):
        super(Toggle, self).__init__()

        # CAVEAT : AnimConglomerationUI connections with functions
        self.qpushbutton.clicked.connect(self.ambocclusion_toggle_button_func)

    def ambocclusion_toggle_button_func(self):
        if self.qpushbutton.isChecked():
            cmds.setAttr("hardwareRenderingGlobals.ssaoEnable", 1)
        else:
            cmds.setAttr("hardwareRenderingGlobals.ssaoEnable", 0)


if __name__ == "__main__":
    PUSH = Toggle()
    PUSH.show()

from PySide2 import QtGui

win_wid = QtWidgets.QWidget()
qpushbutton = QtWidgets.QPushButton()
qpushbutton.setIcon(QtGui.QIcon("D:\\All_Projs\\Python_Proj\\icons\\animal-paw-print.png"))
qpushbutton.setFlat(True)
qpushbutton.setCheckable(True)
layout = QtWidgets.QVBoxLayout()
layout.addWidget(qpushbutton)
win_wid.setLayout(layout)
win_wid.show()
Let me know guys if there is any correction required in the code.
These are few basic examples to create buttons with different approaches.
After spending few years in animation industry in rigging and tech dept i have noticed naming conventions are really important, otherwise you are going to hell because definitely someone is going to curse you.
eg: “l_h_shldr_skn_jnt_01” can be used to filter names in the scene file which reduces the time in selection of joints from outliner for skinning *_skn*
Mirror muptiple joints
This is a situation we all face once where we sit for 20 to 30 mins and mirror joints, adjust and repeat, i faced this in my first job. I was going through some videos regarding facial rigging from Judd Simantov. He did something mindblowing mirrored multiple joints at once with the help of script.
import maya.cmds as cmds
select_jnts = cmds.ls(sl=True)
for x in select_jnts:
     cmds.mirrorJoint(x, mirrorYZ=True)
Orient Joints – Now mixing the above 2 points
All the riggers must be knowing the last joint in a joint chain, I use to name them Null joint
Null – Good for nothing joint
You can name anything you want but name all the last joints with a commom factor so that later you can select all of them with the help of wildcard “*_null*”
import maya.cmds as cmds
select_end_jnts = cmds.ls(sl=True)
for x in select_end_jnts:
    cmds.setAttr("%s.jointOrientX"%x, 0)
    cmds.setAttr("%s.jointOrientY"%x, 0)
    cmds.setAttr("%s.jointOrientZ"%x, 0)
These are some pointers to those who are new to rigging and interested in scripting.
In Maya with the help of pyside2 tools this can be created. This code block will help you create an empty block in which you can write numbers with decimals. But this code will explain more about how to limit the value in the empty block(qlineedit).Note: Before we start the explanation, if you copy the code in maya or any texteditor just remove the indentation and press tab/4 spaces, otherwise it might give you syantax error The first 2 lines are modules import maya.cmds as cmds from PySide2 import QtGui, QtWidgets
Creating and setting the value of qlineedit(empty block) test_lineedit = QtWidgets.QLineEdit(“1.0”)
Below mentioned link will give you in-depth info about qlineedit, kindly read through the doc carefully to understand. qlineedit command reference
Setting limit in qlineedit You can set any value but there is a catch — below 0.0 and above 500000.0 the value wont be printed or returned in the script editor. The decimal limit is set 3, you wont be able to type more than 3 values and test_lineedit is parent. test_range = QtGui.QDoubleValidator(0.0, 500000.0, 3, test_lineedit)#Format of writing the decimal in the Setting the qlineedit for accepting only float values
Note that if there is a validator set on the line edit, the returnPressed() / editingFinished() signals will only be emitted if the validator returns Acceptable.
Well you can even choose direct approach without using an “if” statement, there is no hard and fast rule. go ahead and comment the “if” statement and remove indentation and run, experiment.
def trying():
print test_lineedit.text()
if test_range.validate(test_lineedit.text(), 1):
test_lineedit.returnPressed.connect(trying)
Below is the complete code, sorry there were some errors i have fixed.
import maya.cmds as cmds

from PySide2 import QtGui, QtWidgets

"""
How to write a floating value in QLineEdit
You can only set the length of digits after decimal
"""

def trying():

    print test_lineedit.text()

test_lineedit = QtWidgets.QLineEdit("1.0")

test_range = QtGui.QDoubleValidator(0.0, 500000.0, 3, test_lineedit)#Format #of writing the decimal in the qlineedit


test_lineedit.setValidator(test_range)

if test_range.validate(test_lineedit.text(), 1):

    test_lineedit.returnPressed.connect(trying)

test_lineedit.show()